Struggling with rejected audio books due to non-compliance with ACX (Audiobook Creation Exchange) Audio Submission Requirements can be extremely frustrating. I've been through the same ordeal, watching numerous convoluted and comical YouTube videos and tutorials, desperately searching for a solution. Finally, I stumbled upon a little-viewed video by Rebecca Casselman, which proved to be a lifesaver. In this blog post, I'll share a condensed version of her tutorial, offering you a quick and easy solution using three Audacity effects that actually work.
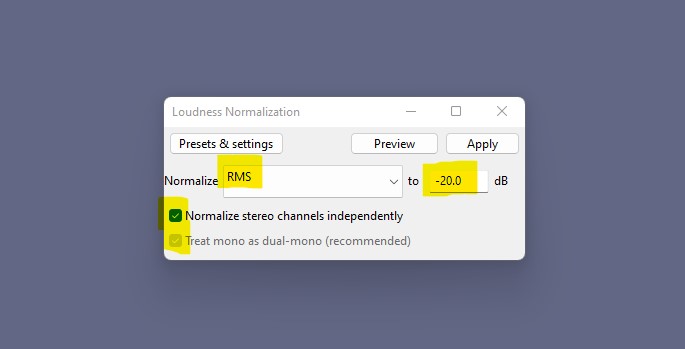
1. The Loudness Normalization Effect:
ACX requires audio recordings to have consistent loudness levels. Audacity's Loudness Normalization effect can help you achieve this requirement. Here's how:
Step 1: Select the entire audio track or the sections you want to normalize.
Step 2: Go to "Effect" in the Audacity menu, then click on "Loudness Normalization."
Step 3: In the normalization options, set the RMS level to -20.0 dB.
Step 4: Preview the effect by clicking on "Preview" and make any necessary adjustments.
Step 5: Click "OK" to apply the Loudness Normalization effect to the selected audio track.
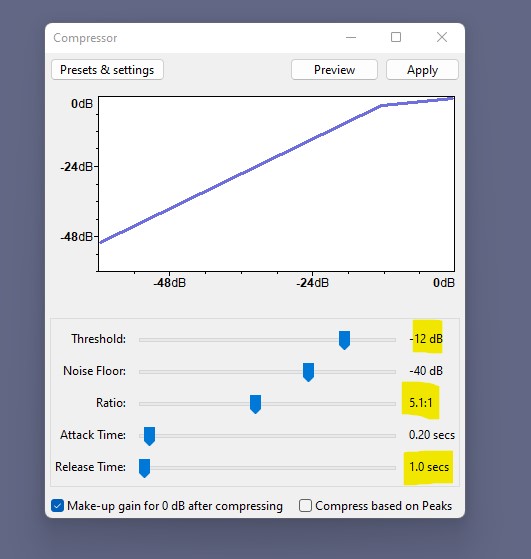
2. The Compressor Effect:
ACX also mandates consistent audio levels throughout the recording, ensuring a comfortable listening experience. The Compressor effect in Audacity is a valuable tool to accomplish this. Here's how to use it:
Step 1: Select the section of your audio track containing typical speech or dialogue.
Step 2: Navigate to "Effect" in the Audacity menu, then click on "Compressor."
Step 3: Adjust the compressor settings to a Ratio of 5.1:1 and a Release Time of 1.0 secs.
Step 4: Preview the effect by clicking on "Preview" and make any necessary adjustments.
Step 5: Click "OK" to apply the Compressor effect to the selected audio track.
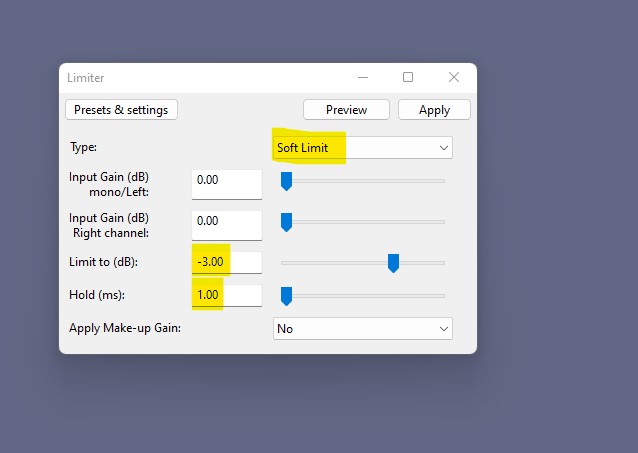
3. The Limiter Effect:
To ensure that the audio peaks stay within an acceptable range, ACX requires the use of a limiter. Audacity's Limiter effect is perfect for this purpose. Here's how to apply it:
Step 1: Select the entire audio track or the parts you want to limit.
Step 2: Go to "Effect" in the Audacity menu, then click on "Limiter."
Step 3: Enable the "Soft Limit" option in the Limiter effect settings.
Step 4: Set the Limit to -3.00 dB to prevent any peaks from exceeding this level.
Step 5: Preview the effect by clicking on "Preview" and make any necessary adjustments.
Step 6: Click "OK" to apply the Limiter effect to the selected audio track.
Thanks to Rebecca Casselman's little-viewed video tutorial, I discovered a straightforward solution to my frustrations with ACX compliance. By utilizing three Audacity effects—Loudness Normalization, Compressor, and Limiter—you can effectively enhance your audio to meet ACX Audio Submission Requirements.
The process is quick, easy, and ensures your audio meets the necessary standards. I hope this condensed version of Rebecca's tutorial provides you with the same relief it brought me. Best of luck with your audiobook production, and may your ACX submissions now sail through without a hitch!

How to Make Your Audio ACX Compliant: Using 3 Audacity Effects